Friday, January 31, 2014

deadzone terrain accesories

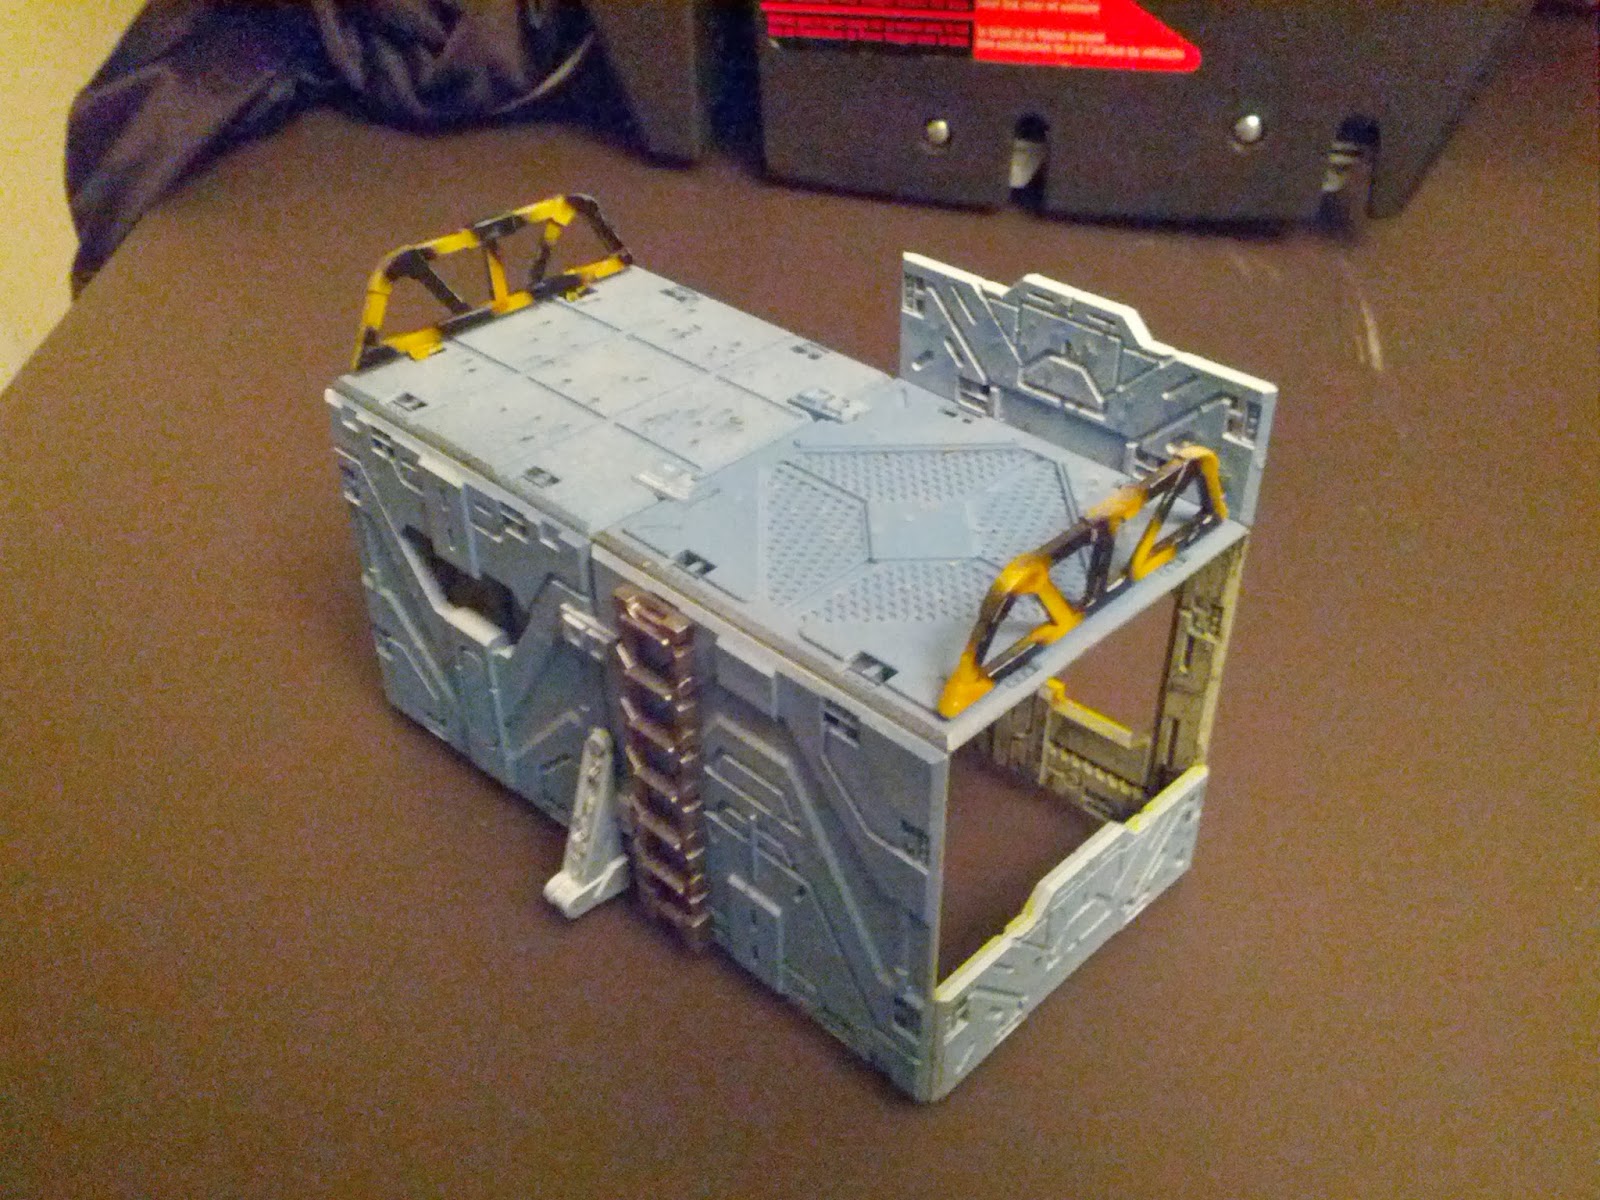
Let's have a look at some of the accessories that come with the deadzone terrain.  First up a couple snaps of my first piece of terrain with some additional details. I added a ladder to the rear and a couple railings to the sides. The railings were sprayed with the same yellow as the detailing on the tiles, and I built a cheap stencil with popsicle sticks to do a quick and dirty job of hazard stripes. They look quite decent IMO and I just used a medium grey to do a quick line highlight. If the highlight got too think I just wiped most of it off.
rear photo from the right
You can also see the ladder which I was originally debating doing in some brighter colour to make it stand out in game - but in the end I decided that for something like that why would anyone put that effort into it, so solid metal it is. I gave it a quick wash with badab black to pick out the rivets. I also did quite a bit of filing/scraping to get the mold lines off, I felt they would really detract from the look.
rear photo from the left
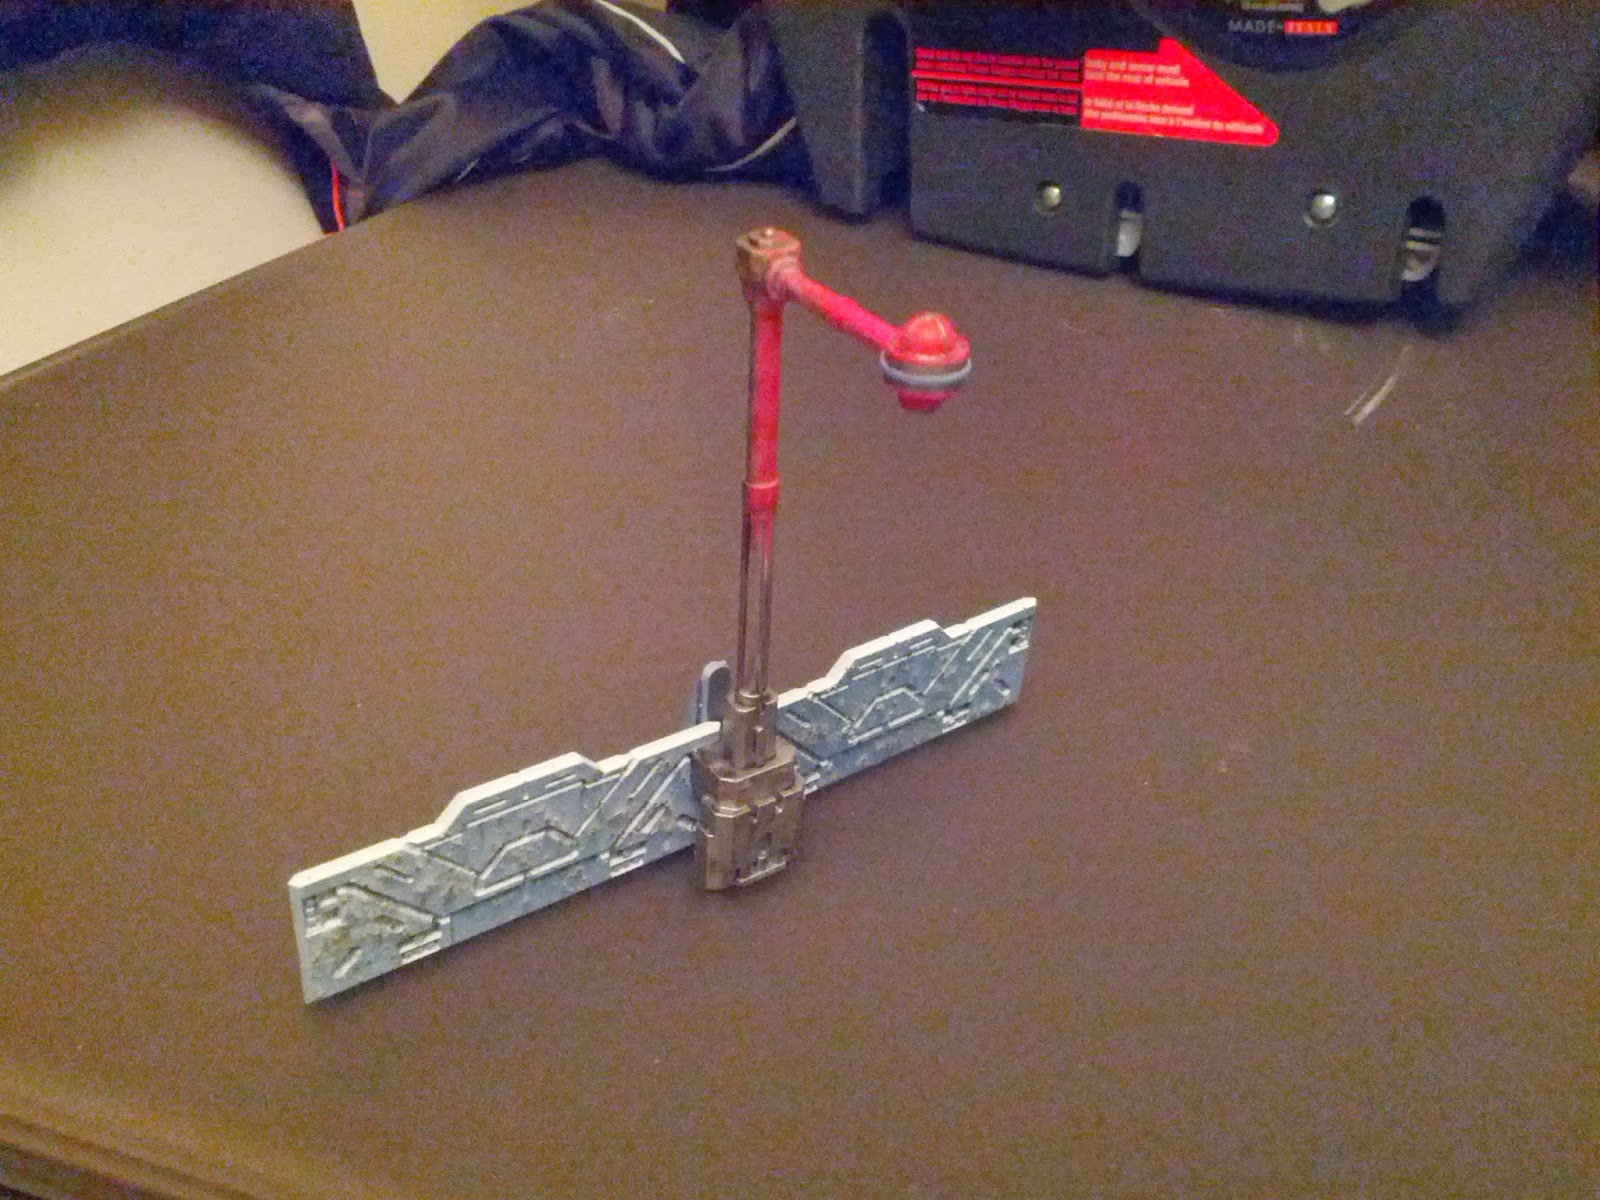
Finally here's a quick barrier I made up from two pieces and a street lamp. I decided that more yellow would not really do justice to the street lamp so I tried my hand at some red OSL. It came out OK, but I think I learned that next time, I am going to drybrush white before each successively brighter layer, because the red alone doesn't make enough difference. We'll see how that goes and compare the two later.
quick barrier with street lamp
Also it isn't quite well balanced - the street lamp connector doesn't quite touch the floor, and the lamp itself makes that side heavier so it leans over. I am not sure what I will do about it, I may use a piece that looks like a girder to prop it up or not, still debating.

Next up for these two pieces will be weathering powders and powders + washes.

Tuesday, January 28, 2014

first piece of deadzone terrain assembled

Found a bit of time late last night to try my hand at assembling some of the tiles I have painted. The first obvious thing to state is you just do not get enough connectors.  I thought people were saying this simply because they got the incorrect number of sprues. I tried to not use a connector in every socket possible to save some and am pretty sure I got away with it for the most part. The terrain is so sturdy I have no worries about even a heavy metal model causing structural integrity issues.
front side, had always planned for windows and barrier with stripe to go together
I still want to add some details to this piece.  I sprayed the ladder & streetlamp pieces metal last night and have been working on some of the crates and railings using a yellow spray as well. This piece will get a ladder going up the back and probably a set of railings or two. I am torn between gluing some crates down or just leaving them loose and putting them wherever they are needed at the time.
using a barrier as a wall will give a new dimension to movement in deadzone
It may seem a bit boring, but this structure manages to do a bunch of stuff I wanted to test out with my first deadzone building - namely 1) a barrier on top for protection 2) using a barrier as a wall 3) lots of doorways/windows/space so you can see the fluorescent lighting tile to a degree (see below). I am also pretty impressed with the strength of the connectors, none have snapped yet and I have used a set of pliers to get them to be as secure as possible.
look at the far roof tile to see the fluorescent lights
Really like the above picture, the grime on the inside walls is quite apparent and it should make for good battle report photos from a miniatures eye view. Once I get the railings and ladders glued on I am looking forward to using some rusty weathering powders to add a final touch of realism and also tie the tiles together since painting them separately is a tiny bit obvious once assembled.
???
PS. Does anyone know exactly what Mantic's thoughts for these pieces were?  They are clearly doors for the open tile next to the windows tile in my building, but there isn't really an easy way to connect them.  The little hook at the top works but I am not sure if they meant them to be glued together or act as temporary doors? Would love some thoughts?

Finally this was my brainchild but I am planning to do a lot of looking around for inspiration before I build the next building.  I also really want to spread around the yellow detailed tiles so I may start spraying up the second batch without any yellow so it's easier to make them appear more special.

Friday, January 24, 2014

mantic deadzone figures - quick review of assembly, quality, mold lines & flash

After getting started on the deadzone terrain, I put the plague faction on the shelf since my plans for painting them involve staining methods and will benefit greatly from a batch approach. Don't quite have the cycles for that at the moment - so I've decided to have a quick go at the marauders since I will probably use a more standard paint method for them and therefore doing a few pieces at at time should not cause a great variation in their appearance.

Lots of rumblings online about the quality of the figures and the difficulty of working with the restic material. Here are my thoughts and a bunch of pics. There is a good degree of detail on the figures - they look really good painted up and that after all is the end goal. Getting there is the issue.  A quick caveat that it seems some factions/figures are better/worse than others - so expect some variation.

First up lets have a look at a couple commandos.  I think there are 3 poses (only 2 in these pics), and I don't really see much capability for converting these particular figures amongst themselves for variation. Perhaps if you include the flame thrower guy you could do a bit of mixing with the model that has both arms attached to the weapon. The running commando is 4 pieces and had a fair amount of mold lines all over - including right through his face?!?!  Definitely a strange one.  The commando at attention was probably the best of these four figures for mold lines.  Easiest to clean areas and some cunningly concealed (practically the opposite of the running figure)
running commando - see where his arm was glued I felt needed some filler
running commando - strange that they have a mold line running through his face
commando at attention - some filler required for his right arm socket
Next up is the mawbeast - or chainsaw dog as some people are calling it. It's funny I dislike GWs cartoony orcs in their fantasy game, but always found it suited the rogue trader universe (aka pre grim-dark) quite well. The above orcs are very reminiscent and this guy fits right in.  The detail is not as nice as on the orcs - his chainsaw tongue's "teeth" aren't very crisp and neither are his feet/toes. I found he required a lot of filling between where the two pieces go together. This may just be me, but I found the gap between the bomb belt and his hindquarters to be very obvious and didn't like it, so I've used a couple rounds of liquid green stuff to fill it. He also has a LOT of mold lines and some like around the tail are easy to clean and some on his legs and feet are very difficult and will probably require further cleaning after a coat of primer. Also you'll notice his bomb is actually miscast I am going to have to sculpt some extra fur over it to cover the blemish (third pic) which is probably not that much difficult from finecast (which when it sucks - it SUCKS)
mawbeast - look at all the mold lines I've had trouble cleaning on his legs
mawbeast - this shows more mold lines and the huge gap between pieces
mawbeast - a huge chunk of the bomb is missing behind his fur
Finally we come to one of the rippers. I would have included a goblin sniper in this review, but both of mine's rifles bent quite badly due to a lack of packaging/protection in my shipment. I would put the ripper between the commandos and the mawbeast. His legs had quite a bit of mold lines and were difficult to remove without damaging the details. Both arms required some minor filler to look good, but this was due to the ability to choose which arms to use with which ripper, giving you the ability for some variety which is nice. His fingers also had tons of flash which was difficult to remove and the mold lines on his head ran all the way around his jaw. I think they tried to conceal it via his mouth line but in my eyes it failed.
ripper - filler was required between both arms & body, see mold lines too
ripper - filler was required between both arms & body
ripper - flashing on legs was minute, but difficult to remove without damage
I fully understand why folks are annoyed.  It is a lot of work to do a GOOD job of cleaning up the figures - if you are someone who doesn't usually bother removing mold lines or only cares to remove one's that will be obvious once painted then these figures are extremely good value. For anyone like me who prefers to do a really good job the amount of effort does add up and reduces the value somewhat since I would still rate it much tougher to clean than plastic, or even metal depending on the metal sculpt.  Still for the price they are good value and I'm looking forward to painting these guys up.

Tuesday, January 21, 2014

deadzone terrain - part 1

Originally my plan concerning deadzone was to get some models painted first. I have tons of suitable necromunda terrain that I could use to play on, so getting this terrain painted seemed a bit overkill. However there have been a lot of really great blog posts up about the terrain (find a sample at the end of this post) and I ended up devising a plan to get it painted using mostly spray paints which means prep, spray & then WAIT. So while I am currently painting up a counts as Ripper for my Insane Goblin Posse to prep for a tournament in February, I thought why not get this going as well. Also my waffling on paint scheme for the plague faction has meant I have not even started assembling/prepping those figs (and a good thing too, since now for the Stage 2 beastie that is vaulting a barrier, I can paint the barrier up in similar style to my terrain!) I may even end up starting to paint the marauder faction first, since it would be a more normal method (no multi-stage multi-colour stains) which means I could paint a couple figs at a time instead of batch painting (also I can proxy the plague with all my genestealer cult stuff)

Tile effect 1 (fluorescent lights)
For the square pieces that look like one side of a rubiks cube, I decided that since they were clearly meant to be a ceiling piece, I would paint one side like fluorescent lights. I realize once assembled you probably won't see it very much, but it will be a nice bit of detail for photos from the right angles and was not very difficult.
  1. prime white
  2. paint a coat of water effects
  3. mask the "lights" in one direction and spray grey to cover the dividers
  4. do the same in the opposite direction
fluorescent lighting tile
Here is the final effect, some of the grey seeped through the masking tape, but not enough to be ruined and it will actually look pretty derelict in my opinion.  Job done.  It looks a bit glossier than it does in this photo, but not a crazy amount.

Tile effect 2 (indoor walls)
Similar with the above, I wanted the insides to have a different colour.  It won't be easily noticable either, but will add an additional level of realism.
  1. spray black (zenithal aimed upwards)
  2. spray necrotic flesh (zenithal aimed downwards)
indoor tile
This gives some depth without a lot of effort - I made a simple spraying container with some bits of cardboard to hold the tiles at an angle to make spraying easier.  These also ended up looking much dirtier after I finished the other sides as some spray paint clearly seeped through the painters tape I used on the back.  Again I feel it just looks grimy & dirty and will suit very well. Job done.

Tile effect 3 (outdoor walls)
Now to make the outdoor walls special, I decided to do a few extra steps so these were generally more involved. I am extremely pleased with how they came out though and won't change anything for the second batch. I used a salt masking technique using cheap hairspray to stick salt to the tiles after the black/metal undercoat so I can easily show some battle damage/weathering.
  1. spray black (zenithal aimed upwards)
  2. spray plate metal (zenithal aimed downwards)
  3. soak the tiles with hairspray
  4. apply salt (I used both coarser sea salt and fine table salt) most folks suggest just the coarser but I felt a combination would look equally as realistic - I am quite happy with the effect
  5. spray space wolves grey
  6. very light spray of white (zenithal aimed downwards)
  7. very light spray of space wolves grey (zenithal aimed upwards) - doing the grey a second time makes sure the white is mostly on the top edges
  8. rub off the salt
outdoor tile
In my opinion these tiles look absolutely fantastic. The chipped areas from the salt masking show a metallic base to the tile which looks like very realistic battle damage - whether from bullets or shrapnel.

Tile additional effect (outdoor walls)
Finally I wanted to do some extra detailing on a few wall sections.  Less is more in this instance you want to pick very few tiles to do this to, since that makes it stand out more.  So I picked about half the tiles, thinking it's easier to skip this step for the next batch if it seems like too much to "dilute" the amount of variant tiles.
  1. use painters tape to mark off the section of wall to be a different colour
  2. soak the tiles with hairspray
  3. apply salt (I used both coarser sea salt and fine table salt)
  4. spray demonic yellow (bright yellow works pretty well with the bluish/grey of the rest of the tiles)
  5. very light spray of white (zenithal aimed downwards)
  6. gryphonne sepia wash
  7. rub off the salt
outdoor tile with detailing
This is the part I am the least happy with. I'm not sure if it was the can of spray paint or if I didn't wait long enough for the hairspray to dry but the yellow was very wet and masked some of the detail.  That's why in the end I did the white zenithal highlight plus the gryphonne sepia wash to try and get that detail back.  In the end it does still look pretty decent and I am satisfied.

Also after rubbing off the salt, I would recommend that for tiles where you plan to do a second round of salt + spray paint (ie. the yellow) that you avoid the fine salt on the first colour (ie. the space wolf grey) since it ends up with several coats of paint over it, it is quite hard to get it back off and it doesn't do enough through the two colours.

For the corner connectors I decided to not even bother painting them at all.  You will barely see them so I didn't see much point.  For the outer connectors I painted them the same way as the outer tiles.  I was debating using the yellow until I was disappointed by it's coverage.

Here are a ton of links to people assembling and painting the deadzone terrain.  There is lots out there to inspire you, especially with what configuration to assemble the buildings/bits.  Next steps for me are to assemble this batch (at least one or two buildings - depending on the yellow bits I may need to paint the other tiles too so I can spread it out) and then applying some weathering powders and other details to the outside - at that point I will try to cover up little mistakes like the spray of yellow on the edge of the tile above.

White's Wolves ** absolutely fantastic tutorials here **
Anarchy of Anton!
Hammer Dialectic
Between the Bolter and Me
GMorts Chaotica

Thursday, January 16, 2014

Mantic Kickstarter (deadzone) - wave 2 update

Mantic has put out an update on the Deadzone kickstarter and it sounds like people are getting pissed. Here is the latest update from Mantic on the Deadzone kickstarter page.  Mantic had issues like this with dreadball, with folks seeing the product in stores before receiving their kickstarter pledges in some instances. Sounds like there will be more of the same happening here.  The comments from Mantic on the kickstarter page/updates are drying up really quick now that these issues are cropping up again. This was my problem with Mantic a long time ago is their communication is crap! I'm reading now they made a bunch of changes to what was included in certain pledges - but only bothered to tell people once they started deliveries.  It's not rocket science that early communication is better.  Plenty of communication happens while they are drumming up the funds - quickly dissolves once all hands are on deck.  It's a bit understandable but just seems like they could really use a permanent customer service officer or something.

The Bad (Mantic as a company, meeting customer demand, customer service, etc.)

This is how my deadzone kickstarter box arrived.  It was very banged up and I consider it fortunate that only 3 miniatures and the rulebook were damaged.  Quite easily the counters and any other restic bits could have been damaged.
piles of unlabeled stuff
Here is an unboxing review on another blog.  I would have appreciated getting my items packed inside the box like that, instead of having most of my stuff just thrown loosely into the cardboard mailing box.  The only stuff that was actually inside my deadzone game box was the fold up mat and one half of the terrain sprues. Everything else was loose in the box, including baggies of figures, all the counters and even the rulebook.  In this unboxing post you can see he laid out everything on the table.  It is a ton of stuff, it really would have been nice for mine to get that extra protection from actually being in the gaming box.  Look at the damage on my rulebook (usually it takes a few years of use to be this damaged)
look at the damage

Compare this to a post by Joel @ Mordian 7th for his Bug Hunt corridors kickstarter.  First - look how lovely it would be to have all the baggies labeled with what they are/should include.  It's crazy they even took the time to punch out all the bits. Some labels would have been nice for Deadzone, I had to reference 3 different URLs to do all my double-checking to make sure I had everything.

Now checking the update from Mantic, you have until January 31st to fill out the form for missing bits.  A shame if you haven't had several hours to document everything you have vs. everything you should have.  I am going to double check the enforcer bits because I assumed I got everything since a lot of the enforcer stuff was delayed to wave 2 to use their new plastics - but now I'm hearing baggies aren't even properly filled so best to check.  It will have been close to 3 months the form has been up, but they weren't actually doing anything with that info until the end of this month.  Then they will have to order stock since it's more likely stuff missing from your order went into someone elses' package than they have stock sitting around.

At the same time, they have now been selling the product so if I was one of the unlucky one's to get nothing - and have to wait for more stock to be ordered because they'd sold stock through retail already I would be flaming mad.

The Good (The game itself, the value of the figures, definitely the terrain)

Jake has written a very cool game, I really like how elegant it is, allowing the game to flow and at the same time offering a lot of room for tactics & strategy.  What is a bit disappointing is the fact that with all the changes via the FAQ @ quirkworthy - I don't know if the rulebook is even a good starting point anymore. There are rules that have no description yet, etc. so for a printed rulebook it's a bit poor form.  However with today's shift towards living rulebooks, I am ok with having updated PDFs, it would be great if they would highlight changes they made so it would be easy to hunt down, but I don't think that's going to happen.

A lot of people are complaining about the figures, and I understand they are nowhere near as nice as GW figures or some other stuff out there.  But you need to consider the price, thinking that these probably ended up costing you around the $1 per figure range - it's hard to complain.  Jake Thornton wrote a piece about cleaning restic - where he "dispels" all the issues with it.  He tries hard to avoid bias, but I think he has failed. He mentions it's no harder than cleaning metal or plastic and I heartily disagree.  It is much more difficult than plastic and different to metal though probably about the same amount of effort.  He also says he hunted through hundreds of pieces to find the worst flash and I again cannot believe that - it seems much more likely to have gone the other way.  Many people find the models difficult so it can't just be everyone else is wrong. Also find it a shame he cleaned one of the "sprue" bits rather than a big piece as part of his post.  I am not looking forward to cleaning my plague big guy, the flashing is terrible and will make getting the detail right a pain.

The terrain is quite nice - though again I hear conflicting reports.  Mantic states it's easy to put the terrain together and take it apart again, but other reports deem it not so easy. Fortunately for me I plan to glue it together, I have so much necromunda terrain that this will just add to it, and I have no need for it to be modular.  There are already a great couple articles up about painting the deadzone terrain - I've gone with zenithal technique, incorporating some salt masking to do some battle damage/weathering.  Then after gluing them into small buildings I will have a go with the weathering powders from secret weapon miniatures.

I should have pics of the terrain up soon, I got too far along too quick to do a step-by-step but there are plenty of tutorials out there.  Hope to get a game in soon.
Space Hulk - suicide mission!

Been doing pretty well on the gaming front recently.  From some Talisman & Citadels in December to even getting a game of 40K and now Space Hulk in.  My brother came over last night and we each took a turn as the terminators on the first Space Hulk mission.  Didn't mess with timers this time around, I need to get that Space Hulk app re-installed on my phone.  I didn't take enough pics for a proper battle report - we were just getting used to the rules again anyways.  A couple nice snaps below.

Here is the best pic I got from this angle - the original and then I did some quick editing using the google+ photo editor to try and make the second a bit more interesting, by focusing on the marines/keeping them sharp while making the genestealers a bit fuzzy.  Also used a filter called "Moody"
original
edited & filtered

This was the only pic I got from this angle - thankfully it turn out OK.  I like the "tunnel" view of proceedings, and tried to do the opposite of the first, keeping the genestealers clear & sharp and making the terminators look blurry.  I used some filters too "Dark 2" or something like that.  They look pretty good for 30 seconds of editing!
original
edited & filtered
I hope to play this game much more this year.  It's pretty quick to setup and now that I have both sides painted up (neither by me I will mention) it just looks fantastic.

Tuesday, January 14, 2014

40K 6th ed. 2nd game (first with new marine codex)

Got my second game of 6th edition in, vs. Leo of the previous game. Around 5 months between games shows how little I actually play 40K at the moment.  Leo brought his Eldar from the previous battle bolstered with the new wraithlord monstrous creature thing, and a bunch of wraithguard that counted as troops along with the essential psykers, dropping the crimson hunter and fire prism but keeping the obviously strong wave serpents.
my deployment
Having recently finished my novamarines assault terminators, I was tempted to bring them, but at 1500 points there just didn't seem to be enough space, and without a valid way to get them into assault without a land raider, they seemed a bit of a liability.  I brought Tigurius to try and combat his psykers, a 10 man terminator squad, 2 tactical squads in drop pods, a scout squad with Telion and another scout squad in a land speeder storm bolstered by a thunderfire cannon.
Leo's first move
Leo took a bunch of pics of my deployed units, and I tended to take a pic a turn, so here are a bunch of pics of my scouts and terminators then some in game pics.  We played the scourging game with 6 objectives.
scouts on the firebase, terminators behind
close up of scouts
terminators and thunderfire cannon
I dropped the first pod and whiffed with both meltaguns on a wave serpent, while Tigurius gated with the terminators and they destroyed most of his guardians.  Thunderfire missed even with prescience.
end of turn one
another shot before turn two
Turn two and Leo focuses on my terminators - who at first seem invincible, but then begin to drop like flies.
Leo turn two
My turn two I gate away from combat and focus a lot of fire on the wraithguards without template weapons, causing a lot of wounds and killing everything but one and his farseer.  His other wraithguards whiff trying to kill my scouts in the firebase.
end of turn two
Other drop pod with tactical doesn't really do enough - I was torn between bolstering where my other units were or providing a distraction and challenging for objectives.  In the end they didn't do any damage and just got shot up.
begin of turn three
I crucially failed at all to user the ultramarines tactics (Tigurius meant I often used prescience on an appropriate unit, but I probably needed one more drop pod so both tactical squads could land at same time and take advantage of the rerolls.  I also misunderstood overwatch and didn't realize his wraithguard with template weapons could overwatch at my charging terminators - which meant they died before reaching combat.  That about sealed it.

I've learned this army really doesn't have any "punch" to combat the creep of other codexes.  That plus space marines becoming a flexible/finesse army and losing combat tactics means a serious re-think about this army.  Lots of troops is great, but the terminators are pretty expensive for what you get.  Not sure what I can easily add to make it competitive so it may sit on the back shelf for a while, or could go up on the block in the future.

Sunday, January 5, 2014

Novamarines terminators

First painting points of 2014 - yes it's kind of cheating because most of the painting was done in 2013, but I'm not going to not collect the points!  6 terminators, a squad of assault terminators with thunder hammer and storm shield (note the shield bears the novamarines icon) plus a terminator with assault cannon who I also gave a deathwatch shoulder pad due to not having any normal pads left.
assault squad - love the shields!
I'm not going to bother trying to get good pictures until my lightbox from FOLDIO shows up, so just some quickies to show I am done.  FYI I had forgotten about transfers but since these pics I have added the army badge and shoulder pad veteran skull transfers I have been using on my novamarines.
assault cannon with deathwatch honours
This guy I converted with a pair of lightning claw arms and a land speeder assault cannon.  I think he looks pretty decent and it's kind of cool that all the terminator heavy weapons are conversions in this army.  All these guys need now is a coat of varnish to keep them protected.
magnetized chainfist
EDIT: Oops I forgot I also got this chainfist arm painted up.  You may recall I magnetized the arm of my second squads sergeant so I could have a full 10 man squad. Well I figured I may as well give myself the chainfist arm option, always handy to have an option to use up 5 points :) No painting points for this though.

04/24/2014 EDIT
Some FOLDIO lightbox pics
Related Posts Plugin for WordPress, Blogger...