Showing posts with label painting. Show all posts

Thursday, April 24, 2014

Got my FOLDIO!

Well it took a bit longer due to shipping to Canada being slower through USPS - but finally it has arrived and I love it! A very cool portable lightbox that folds together and uses magnets to hold it's shape and a thin LED strip to provide the light. It has multiple background colours too!

Here are just a couple teaser pics. I have begun taking some nicer photos of my figures and updating old posts using them. Check out the links below for some updated piccys!


My spyrers page and the eversor model I might use counts as with them :)
http://gwpertinent.blogspot.com/2007/01/spyrers.html
http://gwpertinent.blogspot.com/2009/09/eversor-1pp.html

The warhammer quest characters page and specifically the warrior priest post.
http://gwpertinent.blogspot.com/2007/01/warhammer-quest.html
http://gwpertinent.blogspot.com/2009/07/warhammer-quest-character-2.html

Some earlier posts from this year have some additional piccys.
http://gwpertinent.blogspot.com/2014/01/novamarines-terminators.html
http://gwpertinent.blogspot.com/2014/04/whq-baddies.html

Friday, February 28, 2014

deadzone mawbeast

Sorry for the crappy pics - I just can't be arsed to spend any time getting nicer photos when I know how easy it will be once my FOLDIO shows up. I've finished up the first mawbeast, taking the advice of my man Axtlinge from Merry Mayhem News & NABBO league fame - and mimicking a "paroedura bastardi" gecko pattern on his fur using the same camouflage colours as the other marauders. I tried building a little "stamping tool" using some pluck foam bits. Unfortunately it was just too big to use on the mawbeasts fur as you can see below.
What I ended up doing instead is making a couple much smaller individual stamps and just doing the pattern manually. I used a dark grey instead of black but the red I kept the same. I used the same coal black I painted the commandos rifles for his nose and used iyanden darksun for his mane & tail. Any metallics are the same as well. A couple watered down coats of devlan mud followed and I am pretty happy with the result.
Did a quick "gem" job on his cybernetic eye and the usual clear acrylic base. When trying to glue him on the first time I accidentally spread the two part epoxy all over and was quite annoyed as I thought I'd ruined the base. However I found out that if you are quick enough and it hasn't set - it is quite easy to wipe the base completely clean with nothing but a paper towel. So a second try later and I had him glued to the same base. Score!
Next up is the first ripper suit. I have been delayed painting this guy because without any assembly instructions I ended up missing a gun piece that is supposed to mount on his backpack. In doing so I put a little accessory right in the way so I've had to do some cutting and chopping to get it to fit and that part isn't primed. Still I intend to get started on him - what are peoples thoughts for his scheme? Should I follow the same simple camo scheme on the marauders or maybe use the bigger stamping tool I couldn't use on the mawbeast? This is what the suit looks like - he is plenty big and will be the first to go on a 40mm clear acrylic base.

Monday, February 17, 2014

second marauder commando

Just a quick one today to show off the second marauder I've finished. That's half of the first four figures I've put together. I hope this camo scheme works well on the ripper suit. Tried to keep the palette very limited.
I would also love some suggestions for paint scheme for the mawbeast I've assembled in this post. I decided instead of using some green stuff to cover up the miscast bomb, I cut the bomb part off anyways since they haven't made a bomb-less mawbeast yet.

Friday, February 14, 2014

first deadzone figure finished - marauder commando

This guy is from the "Marauder Extra 1" bag and is the only piece it contains. I think somehow I ended up with an extra of these guys, though it's hard to tell. I have another commando pose with most of the basecoats done and that should be my next completed deadzone fig. I chose a very "GW 40K Blood Axe Ork" scheme using grey's and a bit of camo. The battle gear these guys have along with all the packs and pouches reminded me very much of the blood axes.
base? what base?
Tested out a couple "tricks" on this figure. One is the manner in which I highlighted his flesh. Everyone knows yellow is a hard colour to get good coverage with, so for a test I tried highlighting his flesh with yellow straight from the pot (it was a P3 yellow, but quite bright) meaning a thin coat did a great job of lightening the goblin green colour and it was much quicker than having to mix a highlight tone. It may be hard to tell from these photos but I was very happy with the result. If anyone cares I can try to take some in progress pics.
on table
on scenery
Trick number two was attempting to use a dip/stain to handle shading.  I mixed up a tiny bit of wood stain with a bunch of water in a paint pot and tried applying it with a piece of foam. It ended up being way to dark and I'm not sure why.  I used the same stain as on my Pit Slaves and just dabbed it on. Perhaps the base colours just don't work as well or maybe I just did not use enough water in the mix. I will have to check out the army painter dips at some point but I managed to clean most of it off with water and a toothbrush. There are bits left which actually just look like dirt & grime so I will probably use a touch of it on every fig in opportune places.
on table
on scenery
The final trick is obviously the clear acrylic base from litko bases (picked up on boxing day sale from the FLGS meeplemart's online shop) It's an interesting concept to avoid the need to paint any bases and pretty much just match whatever scenery you are playing on. At first I was very "gung-ho" to put all the deadzone figures on these bases - but I think I may backtrack from that a bit. While cool when on the scenery it does detract a bit from the figure when just on the table. The plague faction will definitely get them since they have scenery bits as part of the figures and I intend to paint them the same as my terrain. Having second thoughts for the enforcer and rebs factions though. Might use them for a necromunda gang in the future and definitely will be using them for a blood bowl team. Hope everyone likes the "edited & effects" photo at the top of the post - I used some control points in google+ image editor to fade out the base as much as possible, then used some visual effects similar to the space hulk photos I posted earlier this year. It's a bit obvious from the fading but I thought it was fun.

Wednesday, February 12, 2014

getting ready for Daggerbowl VII

In the first couple months of the year, the NAF tournaments in the Ontario/Quebec region are both held in Ottawa. I have been to the CCKO three years running (reports: 2011, 2012, 2013) doing pretty well in 2012. This years plans for the CCKO came together a bit late and being the first weekend after my wife and son came back from a visit out West I didn't want to miss that time with them. I haven't seen most of my blood bowl buddies since Lakeside Cup in August last year so I have been itching to get to a tournament.

Usually I have taken a pass on Daggerbowl.  Ottawa is a pretty long drive for a one day tournament, but this year I've decided to make the trek since I'm not sure when I will have time to make another tournament for a while (since I run the next tournament that's coming up - I won't get a chance to play). Daggerbowl is pretty interesting that big guys are half price and get the Pro skill for free. Chaos Pact seems to be a popular team choice as are halflings.  I convinced the tournament organizer that if halflings can get the Deeproot Strongbranch star player - then goblins should be able to get Ripper.
willy miniatures troll
(Part of me was also thinking this would be the only time I get to Daggerbowl, so bringing the goblins and getting best painted would be a smart move. Unfortunately being a one day, there is no best painted prize - but I had already used the motivation to get my Ripper model painted up so I will continue with the goblins anyways!)

The model I picked up for Ripper is one of the willy miniatures trolls. I felt it would be a good choice because willy figures are pretty large and that would make a good ST6 model. I swapped gryphonne sepia for ogryn flesh and ogryn flesh for devlan mud on this figure to make him look a bit darker & stronger than the other two trolls. That combined with his size will make him quite obviously Ripper.

In "insane goblin posse" terms I am calling him Esham - who was a rapper who wore clown makeup in an album cover that inspired ICP. So the face-paint details I have followed that album cover. He is not 100% complete, but I just need to touch up the face-paint and then glue him to his base - and my FOLDIO lightbox will not be shipping until early march so a quick photo is all I'm going to do for now anyways.

Saturday, February 8, 2014

first deadzone terrain piece finished

Well the first piece is finished. Over the last week I've applied a bunch of weathering powders, some decals and glued on some little "posters" I've printed out. I've tried some different methods of using the powders mixed with washes which worked fairly well. I also have been using 3 different tones of the rust series. I do have to say that it is quite time consuming and I should maybe save these (or even sell them off) for very particular effects and that after seeing the results Anton achieved using modelmates rust spray, it definitely seems a better way to go for large pieces like this.  Perhaps a combination though I am not unhappy with the powder results.
a decal by the door plus powders & washes
The print outs didn't actually print that well - I cheated and just used some old photo paper in the inkjet at work, and some of them faded or misprinted. To be honest, many of them are still usable since they will match the aged/weathered look of the tiles.
fuel storage sign, covered with washes and powders
I am debating whether I should actually glue some fuel tanks to the side of the building or not, I am still leaning towards not, since they will be more useful loose to be placed wherever you need (they could go on the roof too.
warning sign posted and powders & powders/washes
Using the grid on the top I felt it looked really smart to have the rusty wash pool along the grid lines. I tried to use a marauder boot with some paint to leave boot prints but it didn't work very well. Instead I just ended up cleaning (not really the right word) up the boot print with some freehand. It looks OK, but not as nice as I'd hoped.
small decal - sorry for blurry photo
I am really happy with the deadzone terrain - I've mentioned to some friends it's right in between the necromunda bulkheads (which require some card) and the platformer/hexagon stuff (which are more complex to assemble, but can provide much more complex buildings). Looking forward to getting more put together - I hope to get some games in soon.

Friday, January 31, 2014

deadzone terrain accesories

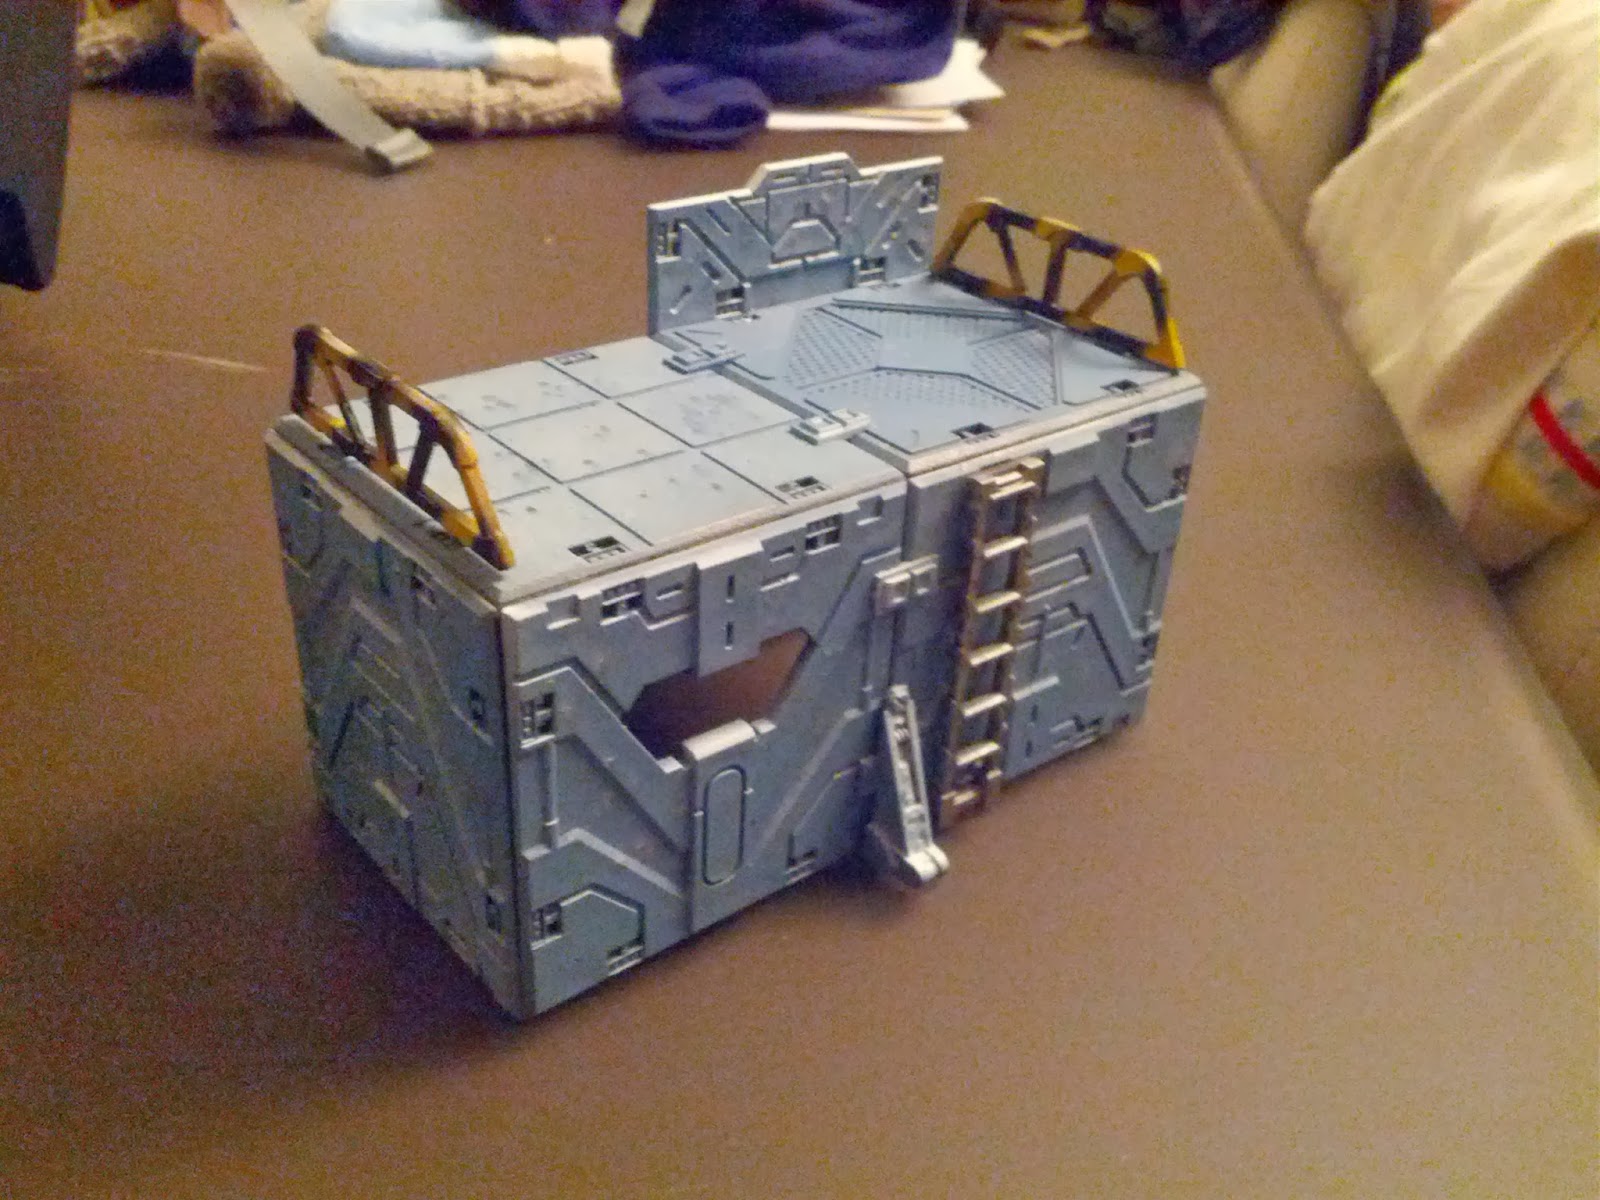
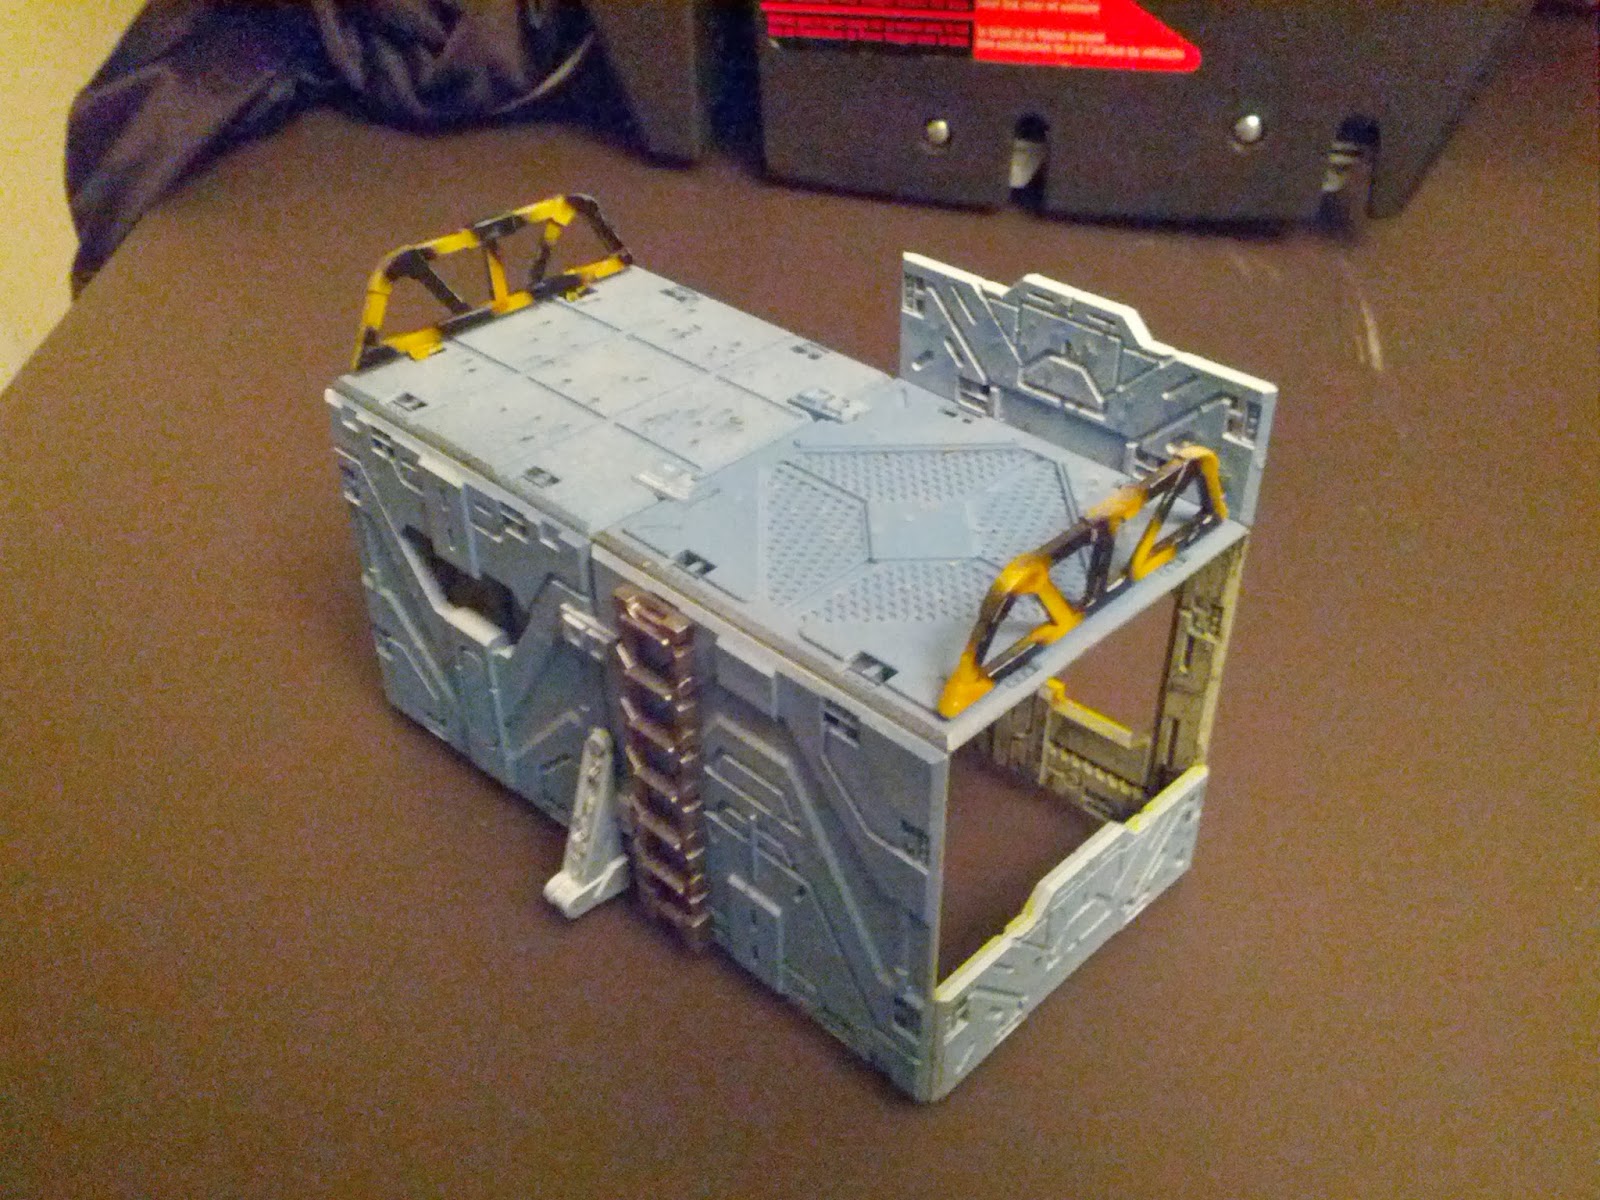
Let's have a look at some of the accessories that come with the deadzone terrain.  First up a couple snaps of my first piece of terrain with some additional details. I added a ladder to the rear and a couple railings to the sides. The railings were sprayed with the same yellow as the detailing on the tiles, and I built a cheap stencil with popsicle sticks to do a quick and dirty job of hazard stripes. They look quite decent IMO and I just used a medium grey to do a quick line highlight. If the highlight got too think I just wiped most of it off.
rear photo from the right
You can also see the ladder which I was originally debating doing in some brighter colour to make it stand out in game - but in the end I decided that for something like that why would anyone put that effort into it, so solid metal it is. I gave it a quick wash with badab black to pick out the rivets. I also did quite a bit of filing/scraping to get the mold lines off, I felt they would really detract from the look.
rear photo from the left
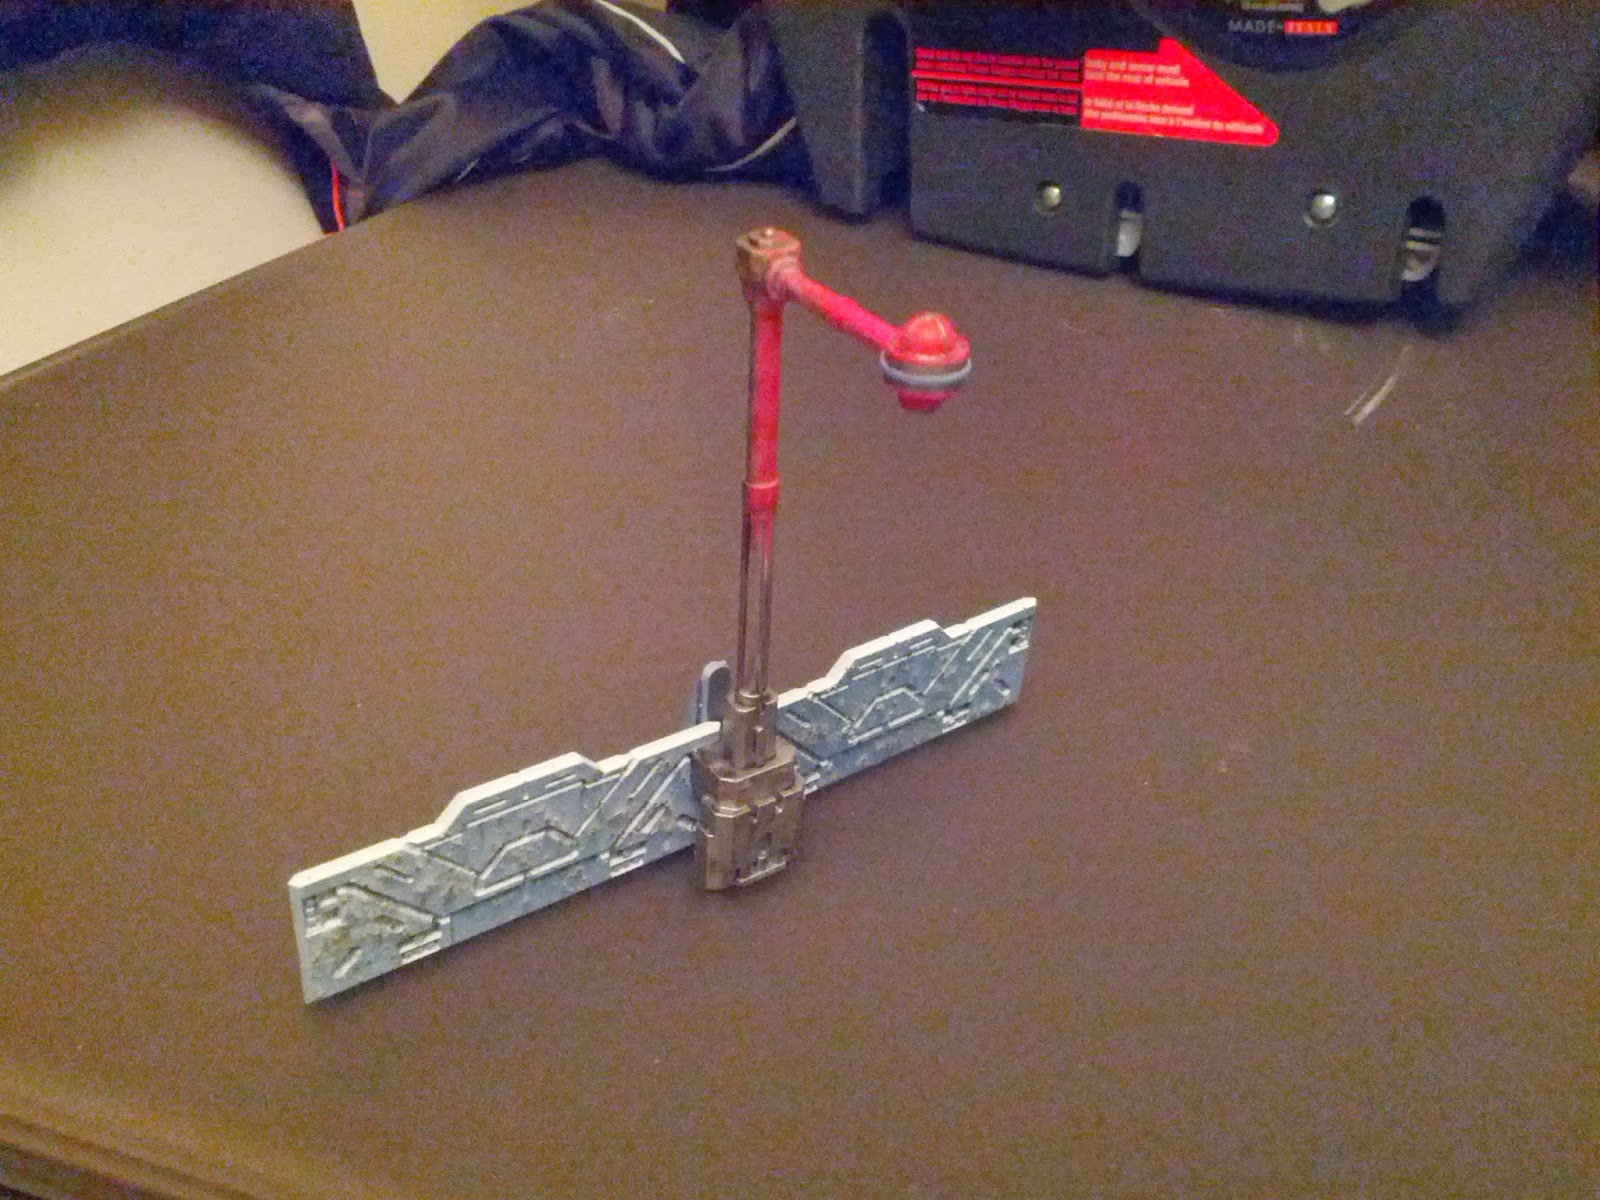
Finally here's a quick barrier I made up from two pieces and a street lamp. I decided that more yellow would not really do justice to the street lamp so I tried my hand at some red OSL. It came out OK, but I think I learned that next time, I am going to drybrush white before each successively brighter layer, because the red alone doesn't make enough difference. We'll see how that goes and compare the two later.
quick barrier with street lamp
Also it isn't quite well balanced - the street lamp connector doesn't quite touch the floor, and the lamp itself makes that side heavier so it leans over. I am not sure what I will do about it, I may use a piece that looks like a girder to prop it up or not, still debating.

Next up for these two pieces will be weathering powders and powders + washes.

Tuesday, January 21, 2014

deadzone terrain - part 1

Originally my plan concerning deadzone was to get some models painted first. I have tons of suitable necromunda terrain that I could use to play on, so getting this terrain painted seemed a bit overkill. However there have been a lot of really great blog posts up about the terrain (find a sample at the end of this post) and I ended up devising a plan to get it painted using mostly spray paints which means prep, spray & then WAIT. So while I am currently painting up a counts as Ripper for my Insane Goblin Posse to prep for a tournament in February, I thought why not get this going as well. Also my waffling on paint scheme for the plague faction has meant I have not even started assembling/prepping those figs (and a good thing too, since now for the Stage 2 beastie that is vaulting a barrier, I can paint the barrier up in similar style to my terrain!) I may even end up starting to paint the marauder faction first, since it would be a more normal method (no multi-stage multi-colour stains) which means I could paint a couple figs at a time instead of batch painting (also I can proxy the plague with all my genestealer cult stuff)

Tile effect 1 (fluorescent lights)
For the square pieces that look like one side of a rubiks cube, I decided that since they were clearly meant to be a ceiling piece, I would paint one side like fluorescent lights. I realize once assembled you probably won't see it very much, but it will be a nice bit of detail for photos from the right angles and was not very difficult.
  1. prime white
  2. paint a coat of water effects
  3. mask the "lights" in one direction and spray grey to cover the dividers
  4. do the same in the opposite direction
fluorescent lighting tile
Here is the final effect, some of the grey seeped through the masking tape, but not enough to be ruined and it will actually look pretty derelict in my opinion.  Job done.  It looks a bit glossier than it does in this photo, but not a crazy amount.

Tile effect 2 (indoor walls)
Similar with the above, I wanted the insides to have a different colour.  It won't be easily noticable either, but will add an additional level of realism.
  1. spray black (zenithal aimed upwards)
  2. spray necrotic flesh (zenithal aimed downwards)
indoor tile
This gives some depth without a lot of effort - I made a simple spraying container with some bits of cardboard to hold the tiles at an angle to make spraying easier.  These also ended up looking much dirtier after I finished the other sides as some spray paint clearly seeped through the painters tape I used on the back.  Again I feel it just looks grimy & dirty and will suit very well. Job done.

Tile effect 3 (outdoor walls)
Now to make the outdoor walls special, I decided to do a few extra steps so these were generally more involved. I am extremely pleased with how they came out though and won't change anything for the second batch. I used a salt masking technique using cheap hairspray to stick salt to the tiles after the black/metal undercoat so I can easily show some battle damage/weathering.
  1. spray black (zenithal aimed upwards)
  2. spray plate metal (zenithal aimed downwards)
  3. soak the tiles with hairspray
  4. apply salt (I used both coarser sea salt and fine table salt) most folks suggest just the coarser but I felt a combination would look equally as realistic - I am quite happy with the effect
  5. spray space wolves grey
  6. very light spray of white (zenithal aimed downwards)
  7. very light spray of space wolves grey (zenithal aimed upwards) - doing the grey a second time makes sure the white is mostly on the top edges
  8. rub off the salt
outdoor tile
In my opinion these tiles look absolutely fantastic. The chipped areas from the salt masking show a metallic base to the tile which looks like very realistic battle damage - whether from bullets or shrapnel.

Tile additional effect (outdoor walls)
Finally I wanted to do some extra detailing on a few wall sections.  Less is more in this instance you want to pick very few tiles to do this to, since that makes it stand out more.  So I picked about half the tiles, thinking it's easier to skip this step for the next batch if it seems like too much to "dilute" the amount of variant tiles.
  1. use painters tape to mark off the section of wall to be a different colour
  2. soak the tiles with hairspray
  3. apply salt (I used both coarser sea salt and fine table salt)
  4. spray demonic yellow (bright yellow works pretty well with the bluish/grey of the rest of the tiles)
  5. very light spray of white (zenithal aimed downwards)
  6. gryphonne sepia wash
  7. rub off the salt
outdoor tile with detailing
This is the part I am the least happy with. I'm not sure if it was the can of spray paint or if I didn't wait long enough for the hairspray to dry but the yellow was very wet and masked some of the detail.  That's why in the end I did the white zenithal highlight plus the gryphonne sepia wash to try and get that detail back.  In the end it does still look pretty decent and I am satisfied.

Also after rubbing off the salt, I would recommend that for tiles where you plan to do a second round of salt + spray paint (ie. the yellow) that you avoid the fine salt on the first colour (ie. the space wolf grey) since it ends up with several coats of paint over it, it is quite hard to get it back off and it doesn't do enough through the two colours.

For the corner connectors I decided to not even bother painting them at all.  You will barely see them so I didn't see much point.  For the outer connectors I painted them the same way as the outer tiles.  I was debating using the yellow until I was disappointed by it's coverage.

Here are a ton of links to people assembling and painting the deadzone terrain.  There is lots out there to inspire you, especially with what configuration to assemble the buildings/bits.  Next steps for me are to assemble this batch (at least one or two buildings - depending on the yellow bits I may need to paint the other tiles too so I can spread it out) and then applying some weathering powders and other details to the outside - at that point I will try to cover up little mistakes like the spray of yellow on the edge of the tile above.

White's Wolves ** absolutely fantastic tutorials here **
Anarchy of Anton!
Hammer Dialectic
Between the Bolter and Me
GMorts Chaotica

Sunday, January 5, 2014

Novamarines terminators

First painting points of 2014 - yes it's kind of cheating because most of the painting was done in 2013, but I'm not going to not collect the points!  6 terminators, a squad of assault terminators with thunder hammer and storm shield (note the shield bears the novamarines icon) plus a terminator with assault cannon who I also gave a deathwatch shoulder pad due to not having any normal pads left.
assault squad - love the shields!
I'm not going to bother trying to get good pictures until my lightbox from FOLDIO shows up, so just some quickies to show I am done.  FYI I had forgotten about transfers but since these pics I have added the army badge and shoulder pad veteran skull transfers I have been using on my novamarines.
assault cannon with deathwatch honours
This guy I converted with a pair of lightning claw arms and a land speeder assault cannon.  I think he looks pretty decent and it's kind of cool that all the terminator heavy weapons are conversions in this army.  All these guys need now is a coat of varnish to keep them protected.
magnetized chainfist
EDIT: Oops I forgot I also got this chainfist arm painted up.  You may recall I magnetized the arm of my second squads sergeant so I could have a full 10 man squad. Well I figured I may as well give myself the chainfist arm option, always handy to have an option to use up 5 points :) No painting points for this though.

04/24/2014 EDIT
Some FOLDIO lightbox pics

Tuesday, December 31, 2013

2013 achievements and what's coming in 2014

Once again I had a very busy December, though because we stayed in town this year and have had our first child, that business was having a very proper Christmas setup and a bunch of hobby time catch up!

I have to say, 2013 was another amazing year!  Due to personal commitments I didn't get as much gaming time for tournaments and such, but that's OK - becoming a father means I am going to have to sacrifice those types of things more often so best get used to it! I managed to make it to four blood bowl tournaments this year and also ran one for the first time - I got the two in that mattered the most (Zlurpeebowl and Lakeside) and managed to win the Best Appearance trophy at ZBIX.

On to other matters - first up my planned items for 2013

Of the 3 mentioned projects I was planning to attempt this year, I completed 1 - the necromunda walkways. In terms of more necromunda stuff I did get some dark vengeance cultists converted as a Redemptionist gang and am very happy with them. Once Ric @ Ricalope puts up a tutorial I plan to give it a go using his method for painting these guys - they have the same bases as my Flesh Tearers and will fit right in as cultists when using the chaos-y corsair models I built.

I had also been planning to bring my Insane Goblin Posse to Zlurpeebowl and gun for best appearance - CHECK! This required adding something more to the team (required by me) so I got a couple more basic goblins painted up.

I failed completely to paint the Ravenwing at all - partially because I needed a few more bits to finish building but mostly because GW annoyed the hell out of me with some stupid decisions and make me re-evaluate my loyalty.

I failed at painting some of the chaos-y/corsair marines I had built for my raptor legion - solely because the primer went on too thick and obscured some details - however I did get some more raptor legion marines painted and even more assembled.

However I am really happy that I managed to finish up several long outstanding projects


I managed to paint a lot more than I expected to finish with a new baby - score one for motivation/focus (ie. if I get 20 minutes to paint, spend over 15 of those minutes actually painting)


I currently have 6 terminators in progress for my novamarines - it doesn't look like they will be finished for this year, but they will give me a good start to next and that combined with scaling down the eventual plans means I just want to paint up a second land speeder storm and will consider that army "finished".  I hope to get some games in for 2014 and then may consider putting it up for sale/trade.

Other plans for 2014 include;

  • Making the Canadian Open blood bowl tournament bigger and better than ever.  Check out more information on the NAF Canada website or on the NAF forum thread.
  • Getting some Deadzone figures painted up.  I plan to start with my plague faction as I have lots of them and some ideas about using staining and washes to get a good effect.
  • Painting up the Redemptionist cultists if Rics tutorial is done this year.
  • I have some plans for a couple blood bowl teams to increase what I can use.  One is a proper team to build and paint as a themed counts as Necromantic team.  The other is a very quick & funny themed Ogre team.
  • Finishing up the Novamarines as mentioned above and getting some games in with them.
  • Once my FOLDIO lightbox arrives, getting serious about nice pictures for the blog and starting to go through my painted stuff bit by bit.
Happy New Year to my followers and best wishes for a great 2014!

Friday, December 27, 2013

(MFP) must finish project #1 - finally complete!

FINALLY finished.  Almost three years in the finishing I've got my blood bowl orc team complete. Earlier in December I finished up the reroll counters, the score counter was previously painted and I got it based at the same time and now I've finished the turn counter.
turn marker
I do want to paint the rims of the rest of the team black, so I can fix up their base numbers and add some coloured lines to make the positionals more explicit and to match these bases better.  In the new year I will take some updated team photos.

Even more WHQ monsters

As previously mentioned - I was unsure of my ability to get through a batch of 6 terminators over the christmas holidays, so I had pulled out a few more WHQ monsters to try desperately to reach that painting points goal for 2013.  Up now is the spiders..  +4 PP
no flash
Quickly the recipe was;

  • prime them with a necrotic flesh army painter spray
  • paint a triangular blend from yellow to reddish on the middle of their body round to the end of the bulb
  • paint one segment of the legs red
  • paint the pincers/mouth silver
  • drybrush black all over
  • 2x army painted strong tone on the legs
  • paint eyes silver, then lime green

flash
I actually prefer the shot with the flash, it kind of gives the impression of a light being shined on them, and it's definitely easier to see their details.  Also I am looking forward to taking better pictures next year - my parents and brother got us an amazing new camera for christmas with the new baby (including a tripod) and I got myself and my dad a small portable lightbox (FOLDIO on kickstarter - I recommend you check it out, it is an amazing deal!)

Friday, December 20, 2013

minis painted for others... skaven for hakomike!

Continuing the painting point train and also bringing my total for miniatures painted for others this year up to 5 is this skaven model I painted for hakomike. Most of my regular readers will recall the absolutely stunning harlequin that Mike painted for my Necromunda spire brats gang - truly one of my favourite miniatures and a totally gorgeous paint job. I knew my own contribution to him wouldn't be anything like that, but to his eternal credit Mike cares more about the thought and care than the actual results.

This has been a long slog - mostly due to my own painting and other changes in real life getting in the way, but also a lack of fur meant my plans for lots of staining/washes had to take a backseat.  Well almost 2 years later he is finally done!  I am also really happy to hear from Mike that he matches the rest of his skaven army pretty well - so job's a good 'un!
warplock engineer I think??
I originally was jazzed to use a staining method for this guys fur, but he ended up having so little of it, I don't think it has as big an impact (of looking very natural) as I'd hoped for - in the end I am more happy with his weapons' blades & the "warpstone ball" on his backpack, which was simply P3 coal black with mithril silver edging, then a purple wash and then another smaller round of edging and another layer of wash.  It gives it a nice evil looking sheen.  I need to fix up the lenses because I screwed up where the little dot of white goes, but other than that, he is finished and I will be shipping him off to Mike in the new year.

Tuesday, December 17, 2013

More WHQ monsters...

A few more quick PP before the end of the year. As mentioned in my previous post I had assembled these plastic bat miniatures using some old flying base stands and more bases made of washers for my WHQ baddies collection. I definitely don't want any of the monsters to look any better than the characters so for that reason these guys were done with stains/washes mostly similar to the minotaur I just finished.
4 down, 8 to go (and find!)
Really like that I decided to use the clear flying base posts instead of the plain plastic ones that come on their base - it really adds a lot to these figures IMO.

At the same time I got the last 2 goblin spearmen painted up cheaply and based.  My plan is to use a bit of watered down wood stain on them plus the night goblin archers to act as a cheap "dip" and provide some depth to their paint jobs. Quick and easy.

I've pulled out 4 plastic spiders and if I get a chance I will attempt to get them painted with stains/washes. I'm saving the novamarine terminators for my week off since they are a proper batch and will need some focus to accomplish.

Friday, December 13, 2013

WHQ Minotaur #2

Well here is another quick 2 PP.  A while back I picked up a box of WHQ monsters when I spotted it in an old FLGS (two headed dragon) it was both cheap and good value because the bat/spider figs are tough to find alternatives for.

I had packaged off the minotaur along with another fig to Dave at mini painting 4 free.  Unfortunately real life got in the way so after a period of time I just requested he send them back no matter what state they were in. He did mostly finish another figure but this guy just had a coat of black primer.
minotaur #2
I decided he would be easy to finish before year end, especially if I used a mostly wash/stain approach to his skin & fur.  I picked red & purple as colours to add because the other minotaur I have (came painted) has green & blue. I used a washer to make his base as with all my other WHQ monsters.  They are cheap and easy to do with some simple card to make broken up flagstones and a touch of flock.

I wasn't originally planning on it, but getting this guy finished prompted me to pull out the two remaining spear armed goblins I needed to finish to get up to the required 6 and I also started converting and painting the bats from the box.  If I keep several projects going I think I will have a better chance of hitting my year end target.

Tuesday, December 10, 2013

(MFP) must finish project #1 - 4 down, 1 to go!!

Just a quick one today - finishing up this project dates back to 2010!!  In February of that year, I posted about the figures to finish up - then a bit later I got the snotling score counter painted (but not based). Later in April just before the Challenge of Q'ermitt that year I had painted up 2 more each of blitzers and blockers as well as 3 star players and an apothecary.

I recently received a PM on the talkfantasyfootball forums and one of the members liked my orc team and offered me some free resin cast counters (orcy block dice) he had leftover.  Since those were the counters I couldn't figure out - I was happy to accept and now I have managed to get a quick paint job on them.
orcy block dice counters
Includes 3 reroll counters and a counter I will use for a leader reroll.  I have also gotten the snotling based and begun painting the turn counter - which will "finish" off this project once and for all (I may update the numbers/lettering on the bases at some point in the future)

I'm still gunning for my 2013 painting points goal - other than the counters I have a skaven engineer for hakomike nearly complete, a minotaur for my WHQ baddies nearly complete and 6 novamarines terminators I am going to attempt to finish over the holidays.

Wednesday, October 30, 2013

Some painting finished earlier...

I mentioned in the previous post I had managed to get some painting done in the build up to the family addition.  This raptor legion tactical squad had been assembled and partially primed for a while, so I tidied up the old primer grittiness by scraping with an exacto and gave them another coat.  Then I followed the same pattern as my older models using mostly washes with a bronze metallic and some dheneb stone for details with a touch of metallic-y yellow.  They still look great IMO and are super quick to output.
test photo from within display cabinet
With the latest codex release, the Raven Guard have their own Chapter Tactics that have altered slightly from the stuff previously implemented with Shrike.  Forge World have also released some chapter tactics for the badab war chapters and it gives rending to boltguns/bolt pistols if they don't move (classified temporarily as heavy to ensure no crazy combos with the dark angels salvo banner - damn!)

I am pretty torn on these guys - I have 5 assault terminators that I think I can get assembled and painted before the year is out (I still have aspirations of beating my target of 100 painting points) and along with the models already done that would be right close to 1000 points of marines.  A squad of scouts or something would put it near that level.  At that point I am wondering if it's really worth hanging onto or if I should look into trading/selling it.  I need to cut back on the marine armies as it's obviously a bit overkill and I would rather keep armies that play differently (like the Ravenwing army) instead of tons of tactical/assault squad based armies.  Any thoughts?  Or suggestions on the one thing to add to this to bring it around 1000 points and maybe make it more appealing?

Tuesday, August 27, 2013

"The Cure For What Ails You"

I would like to point your weasel-y noses (no, not THIS type of weasley) at a contest David (Laughing Ferret) is running to celebrate 200K hits and nearing 300 followers (congrats!).
Lasting 11 days, with 11 options for prizes - I dearly hope to score the dwarf referee who would match my Karak-Nhati Bengals blood bowl team (painted by David - see his post here) very well and whose post conveniently satisfies option #3 for an extra point!

Wednesday, July 24, 2013

Minis Painted for Me!

Well I have been focusing on building some more units to send to Ricalope thanks to getting back my first box of Flesh Tearers and getting a game of 6th edition in.  I have been getting those figs varnished - and writing rosters for the upcoming Lakeside blood bowl tournament.  However a pleasant surprise was posted on my facebook this morning - my buddy Dan (who will unfortunately have to miss this tournament) has finished painting up a spire brat for my ever growing gang - and that reminded me I STILL owe Paul of The Man Cave a photo posted of his contribution to the cause!  So I got off my backside and snapped a quick pic of his brat as well as one painted by Mik over at Miks Minis.  Shown in order received...
a ginger brat from Paul @ The Man Cave
A ginger haired brat inspired by the man himself, I love the job he's done on the power sword! Of course if you've seen my Novamarines you will also know I am a fan of quartered schemes.
a dark reaper'esque brat from Mik @ Miks Minis
Mik chose to do this harly (I believe it's properly called a Death Jester?) up in a scheme very similar to the old 'Eavy Metal scheme used on the Eldar dark reapers.
a "Mardi Gras" brat by my buddy Dan
Dan told me he took inspiration from "Mardi Gras" for his brat.  I love the way the green mask stands out on this mini.

Saturday, May 4, 2013

minis painted for Axt - ZOMBIES part 4

The funniest thing of all, receiving a painted model of yourself as a zombie!  This is exactly what happened to Axtlinge (aka Axt) with the final figure of the fab four.  I chose to make Axt a rugby player because he loves the all blacks and the zombie pieces I had suited it.  First the legs weren't proper shorts and seemed to have some extra padding/protection which makes more sense for a proper contact sport.  Secondly the hand with the thumb pointing up reminded me of the Haka dance that his favourite rugby team the All Blacks perform.  I had a bit of help from Abraxis who sent me a couple photos of Axt so I could get him right without giving away the secret - thanks buddy!
zombie Alberto
As with the others, I built up the base with filler.  The flock is the same as used on my figure but underneath I gave it a coat of brown paint instead of green to try and show how rugby fields are usually more torn up than footy fields.  I used some bits of medical gauze twisted and glued to create the long beard and pony tail.  I also used a little water effects for the blood on the recently ripped off leg he's carrying around ;^)

Hope you enjoy them pal!

dual posted on Merry Mayhem News
Related Posts Plugin for WordPress, Blogger...